

We do not offer touch-up paint. The trailer finish is not standard paint; it is an ultra-durable outdoor resin coating called UNA-CLAD Valfon. This fluoropolymer (FEVE) coating is highly resistant to weathering, airborne chemicals, acid rain, and most cleaning solvents. Because of that specialized finish, touch-ups are difficult to blend well. We have tested several paint mixes but have not found one that produces reliable results.
Our colors are Firestone colors: Silver Metallic, Regal Red (matte), Bone White, Patina Green, Hartford Green, Regal Blue, and Sierra Tan. Some companies sell matching touch-up paint in small bottles or pens, but use caution—differences in color match, gloss, saturation, or applicator size can make a scratch more noticeable. One customer had Maaco color-match their trailer and was happy with the paint they provided. The Vistabule Owners Facebook group may also have helpful recommendations.
The black thing that attaches to my window and keeps it closed has broken, how do I get another one?
We call that piece a window “bullet.” It attaches to the “window rod” (even though it’s flat). We can send replacements for about $18 each—just let us know whether it’s for the door window or the porthole window, since the bullet length is different for each. Please submit a Service & Maintenance Request form (bottom right on the Vistabule website).
Yes, a split bed can be installed as an original option at purchase or retrofitted. To retrofit, we cut your existing bed panels in half, adding a cutout for the table leg. This allows you to use the table when one half of the bed is up and one is down. The cost for this is $215.
We do not supply a mattress for the split bed. Below is a list of suggestions for split bed cushions. Prices and details shown are from 2022, when we ordered reference samples. You may also want to check the Vistabule Owners Facebook group for options other split-bed owners may have found.
Cushion Pros.com
https://www.cushionpros.com/cushion-designer/769/11568-chaise/shape
Total cost estimate includes two cushions, tax and shipping: $866.45
There are different prices for fabrics. No returns allowed for this option.
Parameters:
Type: Chaise
Shape: Rounded Rectangle 1 Break
Dimensions: W: 28″ X SC1: 21″ X SC2: 56″ X T: 4″ (SC1 is the “seat” of the cushion)
Ties: Section 1 Break Left| Section 1 Break Right|
Main Fabric: (Color choice here)
Filling: Densified
Style: No welting/Box Edge
Join Option: Join
Total Fabric Required: 8.18
Millard Brands
https://www.milliardbrands.com/products/4-tri-fold-foam-mattress-with-cover
“Single” trifold mattress 75″ x 25″ x 4″
Two with tax and free shipping comes to approx. $192
These ship fast 3-5 biz days
Only 25″ wide
Note that the second option (Millard Brands) is less expensive, but their maximum width of 25 inches would leave a gap between beds or on the outside of the sleeping area.
You’ll have to check the bolt pattern on your trailer to know whether this upgrade is possible. The older frames and jacks used a smaller 3 ½” x 4” bolt pattern while the ARK jacks (standard or ratchet upgrade) both use 5 ¾”x 3 ½”. Aluminum frames can be modified by drilling a couple of extra holes to accept the larger bolt pattern. Most steel frames that came with the older style jack are not compatible with the larger bolt pattern without significant modifications, which we are not able to do at our shop. If you need to make the swap, we recommend reaching out to a trailer/welding/fabrication shop to fabricate a mounting plate that would accommodate the proper bolt pattern, which can then be welded or bolted to the existing tongue to give you a sturdy base to mount a new jack. You should also ask them to add a brace to the back side of the frame to ensure there is sufficient support for the new jack.
The best solution is usually the simplest: apply a few coats of a rub-on finish that soaks into the wood, then reapply every 1–2 seasons. Products like Butcher Block Conditioner, Howards Feed & Wax, Teak Oil, or Boiled Linseed Oil are all good options. This kind of finish protects the damaged wood and can be wiped off the surrounding surface for a clean look.
The factory finish in your trailer is specially applied and is difficult to replicate without fully stripping and refinishing the piece. If the damaged wood is removable, we may be able to send a replacement or install a new one for you here at the Mothership.
If you want to refinish the piece to remove scratches or other damage, it’s best to remove it from the trailer first. Sand the surface with 150–220 grit to remove imperfections and create a smooth, even surface. Then apply thin coats of a protective matte-sheen polyurethane or clear oil, sanding lightly between coats with fine-grit sandpaper (220+).
Open the VictronConnect app and select the MPPT 75/15 (or 75/10). On the main screen, you’ll see a dial showing solar output (watts). Below that, under “Solar,” you’ll see voltage and current—these tell you how many volts and amps are coming from the panels. For charging to occur, panel voltage must be at least 5 volts higher than battery voltage. When we test panels indoors at the shop, we often see about 12V from indoor light. In full sun you should typically see 20V+ (and charging current). If it’s daylight and you’re seeing under 12V, there’s likely a problem. Keep reading for more information.
If your panels have a smooth surface, you can stop here and contact us directly. If your panels have a pebbly surface (like a basketball), read on. We’ve been receiving reports of these panels failing. In the past, we installed (or shipped) warranty replacements from our stock—but we now believe those replacement panels may fail as well (one customer is on their fourth set). Currently, we are out of the pebbly panels and do not have any direct replacements available. We’re working with Sunflare to obtain improved replacement panels, but because these are a custom specification made specifically for us, this process will likely take several months. We know this situation is frustrating, and we are pushing Sunflare to stand behind their product so we can get you replacements as soon as possible.
We’ve placed and order for replacement panels will be in a container from Sweden leaving early August so we will likely see them mid to late September. These Swedish made panels should be of much better quality and have a higher efficiency. SunFlare’s tooling has changed, and each individual cell is now larger, which means that with our limited space on the roof we’ll be getting a lower wattage panel so that it will still fit on the roof. As with our current solar offering, we are expecting more actual output than the older panels due to better efficiency, shading tolerances, etc.
For transparency: while Sunflare was quiet and slow to respond, we began looking for an alternate solution. Starting in October 2025, we began installing solar panels from a different vendor on NEW trailers. If you NEED new panels sooner than August, we are able to offer the new panels this new solution is significantly more expensive
We are working diligently toward a long-term fix. In the meantime, we’re tracking failures in the order they occur so that, once we have a solution, we can send or install replacement panels as efficiently as possible. If you believe your solar panels have failed, please submit a Service & Maintenance Request form (bottom right on the Vistabule website).
Keeping your battery charged without solar panels – First and foremost, charge your battery with the onboard battery charger whenever possible by simply plugging in the trailer to shore power. Shore power provides the best, fastest and most robust charging to make sure that your Vistabule’s battery is truly fully charged. A full Lithium battery should power the cooler/fan/lights and cellphones for 5 days. A second option is to use a portable power station capable of outputting 110v AC power to charge the battery just as you would at an electrical campsite or your home. You can then charge the power station while you drive or via solar panels at camp. As for solar, don’t forget about using a separate Zamp/GoPower brand solar panel plugged into the Zamp/GoPower solar port adjacent to the 110v/shore power plug. And finally in most cases your tow vehicle should be capable of charging while you are towing the trailer.
To make the tanks, we drill holes and cement threaded fittings into place using ABS cement. While ABS cement is intended to be a permanent bond, we occasionally see the large drain fitting leak. Depending on your comfort level, we can either send a replacement tank (current design, without the drain hole) or you can seal it yourself using ABS cement. Neither option is especially difficult—it just involves some time under the trailer. Review the repair and replacement steps below, then let us know which approach you prefer to take.
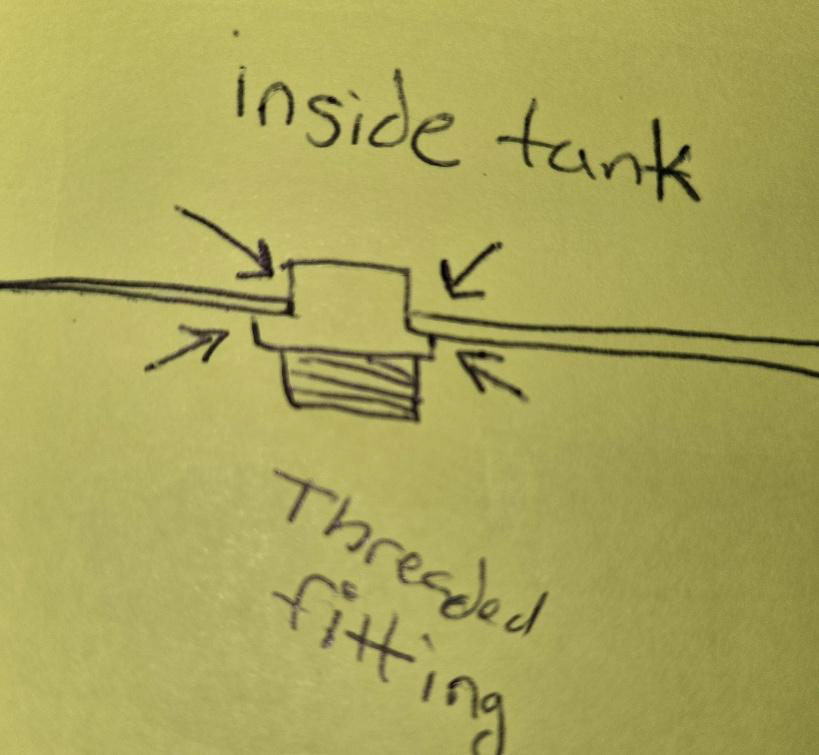
To repair: You’ll leave the fitting in place and apply ABS cement to both the inside and outside of the fitting so it can wick into (and fill) any small gaps. Placing the cement properly on the inside is more difficult, however, it offers the greatest potential for a lasting fix, so it is worth the effort.
Refer to the drawing below, showing where to apply the cement (arrows). Be sure to apply cement all the way around the circumference on both the inside and outside edges. Bending the cement dauber’s metal shaft may help you reach the inside edge more easily.
To remove and replace the tank:
- Loosen the hose clamps and remove the hoses from the tank.
- Fresh tank –
- Removing the white hose may damage the caulk going through the back galley wall -Fresh Tank
- You may find it necessary to unhook and remove the hose from the freshwater fill fitting under the sink to rotate/twist the hose from the barbed fitting on the tank.
- Loosen the 6 bolts holding the aluminum water tank support.
- Trailers before ~720 will have 3 additional ‘hidden’ bolts holding the tank to the frame which can stay in place
- Before removing the bolts, place a bucket/box/block or some other type of prop below the support so it doesn’t suddenly fall to the ground while you are removing the last bolts.
- Remove the prop, water tank and tank support from below the trailer. (Trailers before ~720 – bend the tank support down to allow the tank to slide out.
- Remove the tank and place the new tank in the support.
- Lift into place and support with the prop.
- Screw the bolts back into place.
- Reattach the hoses and hose clamps.
- Fresh tank – Apply additional silicone caulk around the hoses if damaged to keep a watertight seal between the underside and the galley
First, check that your charger is plugged in and has power. It should have at least one LED light illuminated.
Next, log into your battery charger in Victron Connect and make sure that your app and the device firmware is up to date. If you see a red or orange dot on the settings icon (it looks like a little gear wheel), click on it and update the device firmware.
Incorrect settings can also prevent your charger from functioning properly. Log into your battery charger in Victron Connect and hit the gear wheel to get to the settings page and verify that ‘Advanced Settings’ is toggled on (blue color not gray). Click on Advanced Battery Settings and compare or adjust your settings to match the image of the correct battery type.
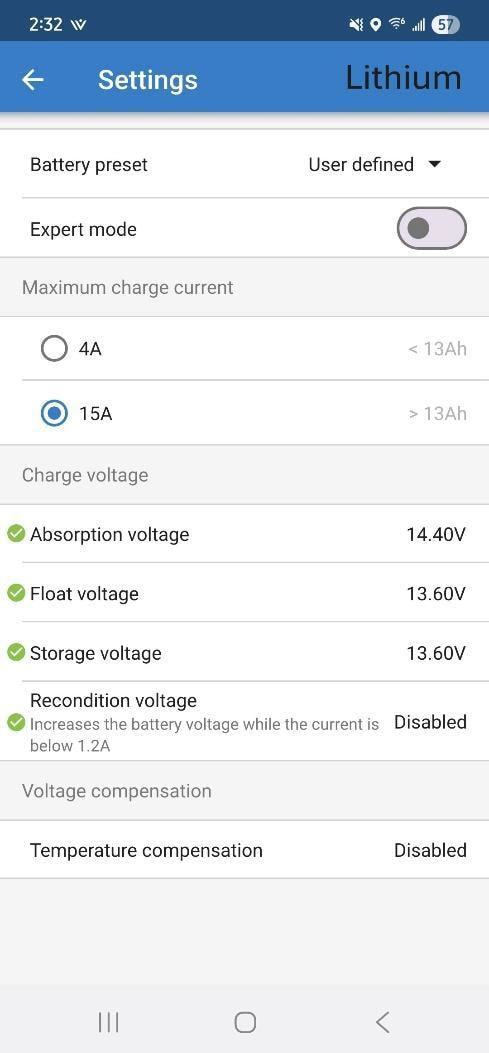
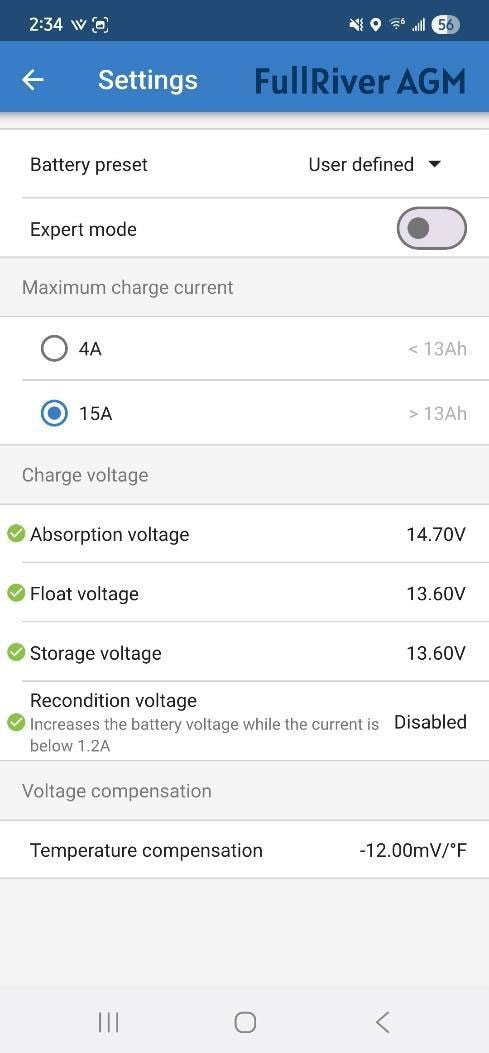
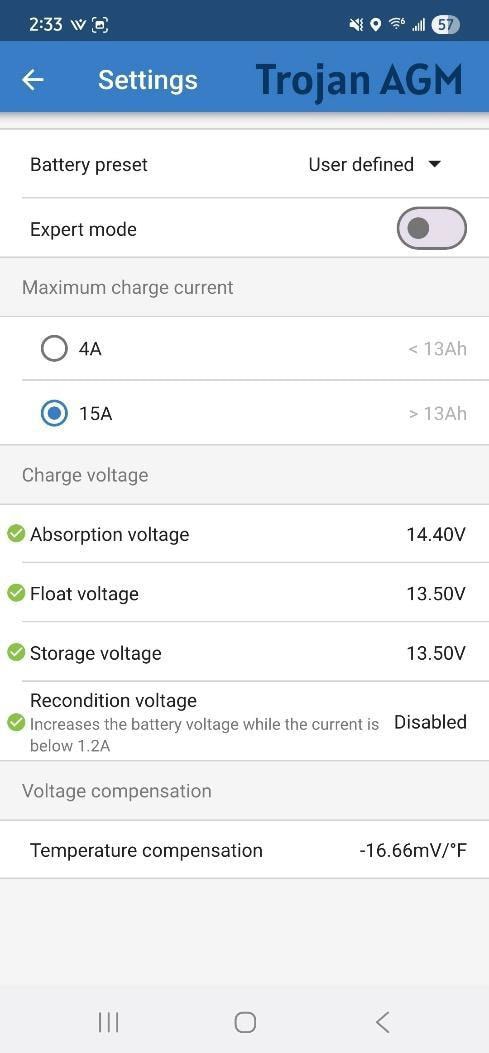
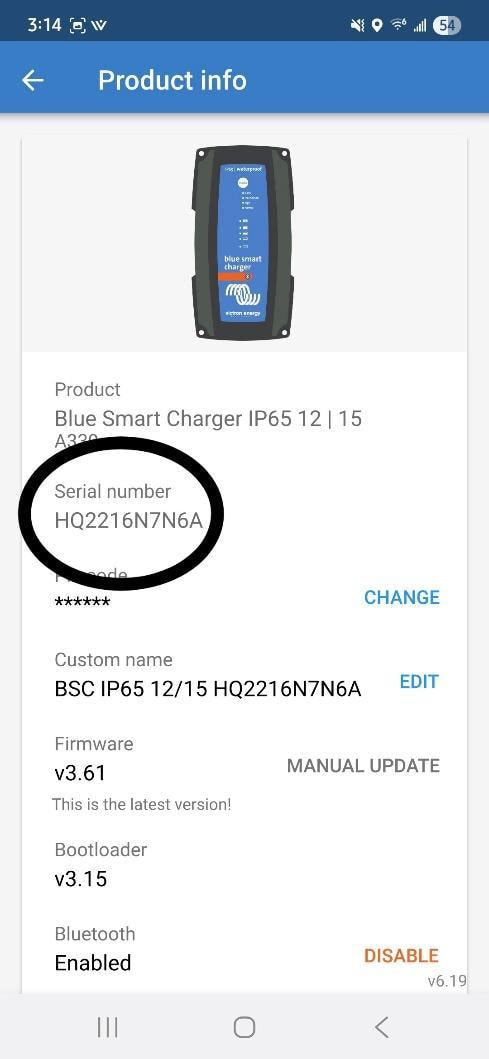
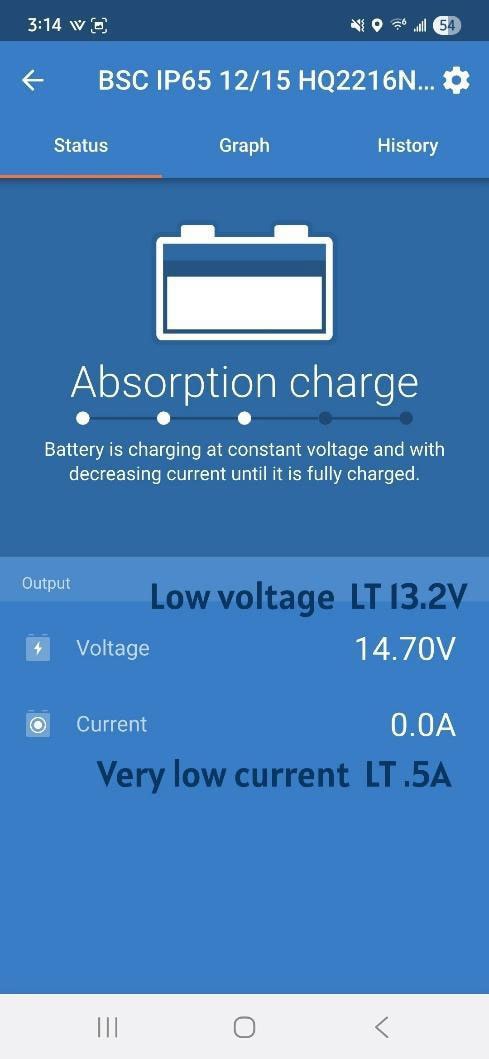
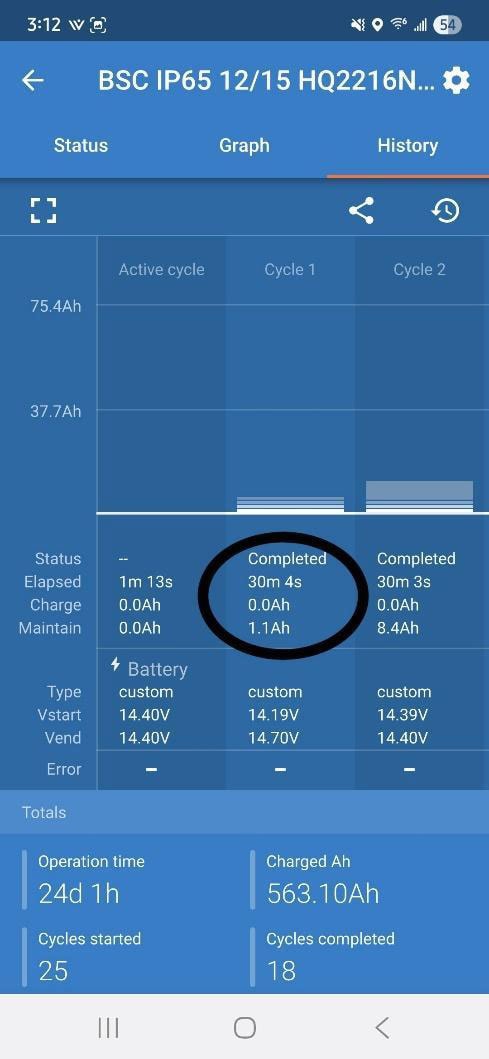
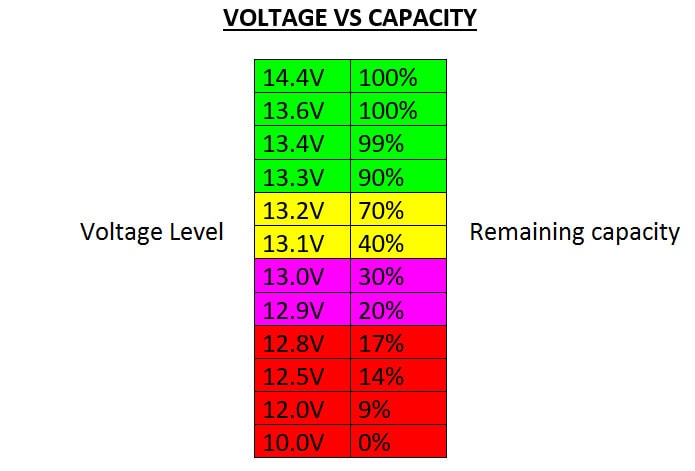
If you continue to have difficulty charging after completing the above troubleshooting steps, it could be a larger issue. We’ve heard from Victron that some of the chargers have a flaw in the circuit board that keeps the charger from working properly over time, often a software update can make the flaw more likely to surface. The symptom is that when the battery is below a full charge (see below for a voltage chart), the charger will start to charge in BULK mode like it is supposed to but quickly switch to ABSORPTION mode with almost no current. If this is what is happening to your charger it will most likely need to be replaced under warranty. Please provide screenshots matching those below showing the charger’s serial number, The Status page showing a low battery voltage (less than 13.2v) coupled with low or no current, and the History page showing recent short charge cycles where little to no power/charge was added to the battery (Vstart and Vend should also show less than 13.6v). Also let us know if you want us to swap it out and when you could come visit us or if we can ship it to you and include a shipping address for our distributor to mail a new charger. Contact us using the Trailer Service and Maintenance Request link at the bottom of the VB webpage.
What you are seeing is the normal hardening, cracking, and discoloration that occurs when rubber is exposed to UV rays (sunlight). When we have inspected the door handle seals for weather resistance, we have found that inside the handle the gasket is still in good shape and doing its job. If you want to replace your door handle seals for aesthetic reasons, they are $3 for the pair.
We purchase Lucas Oil Products Red ‘N’ Tacky Grease, but anything “automotive” that’s similar should work well.
Check out the many videos on Autowbrakes’ website, these are easy to understand and cover many topics. If these videos don’t get you back on track give us a call and we’ll try to help or give you the phone number of Autobrake’s guru Carlton.
The recommended tire pressures are marked on the tires themselves and is also noted on the VIN sticker on the tongue. Pressure recommendations for the different sized tires we’ve used over time:
| Tire | Recommended pressure (psi) |
|---|---|
| Vistabule standard tire – 14” | 65 psi |
| Vistabule spare tire – 12” (for trailers up to #890 or after 890 without electric brakes) | 80 psi |
| Vistabule spare tire – 13” (trailers after #890) | 44 psi |
| Daytripper standard tire – 13” | 65 psi |
With the main power switch turned off (no red light) there should be no power draw. In this state you can leave a fully charged battery for 5 to 7 months without any problems. If the switch is left on, red light illuminated, there is parasitic draw that will drain the battery in about 3 months.
Where does this draw come from? The mood lights’ DC/DC converter, CO/propane detectors, Autowbrake and the red light on the power switch are all sources of parasitic draw in the trailer.
Draw sources:
Power switch – 0.16 amps or 1.92 watts
Mood light regulator – 0.02 amps or 0.24 watts
Autobrake = .06 amps or 0.72 watts
Propane/CO detectors (blinking indicator lights) – 0.13 to 0.18 amps or 1.56 to 2.12 watts
TOTAL – 0.37 to 0.42 amps or 4.44 to 5.02 watts
As soon as you turn off the main power switch, all parasitic draw goes to 0.
The easiest fix is to take the item to an upholstery or canvas shop to have the snap replaced. It’s typically a quick, low-cost repair. If you’re local, this can also be done at the Mothership.
For a DIY repair, remove the damaged snap and install a new one. This Burley kit is a good low-cost option. Another alternative is a kit from Amazon (one of many options). These often include more hardware than needed but may come with pliers-style crimpers, which many people find easier than the hammer method used with the Burley kit.
While snap sizes vary, most use common sizes, and the kits linked above are typically the correct fit.
That flashing red light indicates a fault. The first thing to do is clear the code and try to start the furnace again. The Van Cafe Propex Heater Knowledge Base will have explanations on what your blinking light means as well as videos on how to reset the furnace. Van Cafe is the U.S. distributor we get the furnace from, so they are the experts and will most likely have a fix for your situation.
One of our owners, Jerry Angelo (#??), shared a simple and effective solution on the Vistabule Owners Facebook group—we’ve tested it and agree that it works well!
Mount a 40lb pull angle mount magnetic catch to the top of the cooler pull out deck. This is a heavy-duty, L-bracket latch designed to secure large cabinet doors, RV compartments, and marine lids. You can get the latch from wood working stores Rockler, or Woodcraft.
Here is a quick video showing how to install it: https://www.youtube.com/shorts/_ZDcVRBO6UE
The answer depends on your trailer vintage. For trailers older than #1,000, we are no longer doing roof rack retrofits at the Mothership because some customers caused damage to their trailers while carrying boats and bikes (the roof rack was intended solely for awnings in our original design). If you wish to do this yourself, there may be information on the Vistabule Owners Facebook group. The parts we used on the original system included the Yakima SkyLine Towers, coupled with the #1 Landing Pads.
Trailers after #1,000 have added structural support in the roof which now allows us to install roof tracks to a solid surface and should provide a more solid base to mount a rack. If you would like to add a rack to your newer vintage trailer, reach out to us
Best storage for AGM batteries with Victron or NOCO chargers:
- Plug the trailer into shore power and verify that the charger is getting power by opening Victron Connect where you should see it.
- Charge the battery until you see the Victron charger finish absorption mode and go into float or storage. This will indicate that the battery is fully charged and should take about 7 hours (100amp hour battery charging at about 15amps/hour = 6.66 hours).
- The battery voltage should read between 13.6 and 14.7 volts while still connected to shore power.
- Unplug the trailer and flip through the battery monitor to verify that there are no loads on the battery, you should see 0.0 amps and 0 watts on the monitor, or in the app.
- Leave the trailer alone for few hours to let voltage settle down closer to 12.9v in its ‘resting’ state with no loads. The battery should stay at this resting voltage for several days or weeks before it starts to self-discharge further. This will be a safe state to store the battery for 6-7 months.
- A resting voltage of around 12.9v still indicates a full charge it will settle there because the charger is no longer ‘pushing’ power to it to keep it topped up.
- If it drops below 12.8v within a few days, it may indicate that the battery no longer is able to hold a full charge
- Disconnect the battery and store in a cool dry place if extended below freezing temperatures are expected.
It depends on the battery you have. For trailers that came with the Full River we recommend the current AGM battery we are using, the Trojan 31-AES 100AH battery, If you have or would like to upgrade to Lithium we recommend the NON heated BattleBorn BB10012. If you are upgrading from AGM to lithium we recommend adding the Victron BMV712 battery monitor, IP65 shore power battery charger and Orion DC/DC charger. These additions will allow you to properly monitor and change the battery on shore power or from your tow vehicle.
First, check out this video from Dexter about trailer tire wear. Your axle has a 5-year warranty that can be used at/with any Dexter service center/dealer. Dexter does not typically cover the cost of new tires; they feel that it should be part of your normal maintenance check to monitor tire wear. If you feel your axle is bent or needs inspection, you can take your Vistabule to a local trailer shop/RV dealer to have them take a look and if necessary, they can request a warranty replacement. If you are local to us, we can process the warranty and replace the axle if necessary. In either case Dexter will want the following information:
- the date you noticed the issue.
- photos of the trailing arm tilt (or other axle issue) Typically low to the ground and in line with the wheel to show that the wheel is not perpendicular to the ground
- axle serial number 9 digit number plus last three on the sticker
- how many miles you have driven
- last date and location axle was serviced
- the name of the shop, a specific contact person, phone and email for the shop that you’ve been working with to perform the work
We’ve partnered with PahaQue Wilderness to create a high-quality all-weather cover that compliments the quality of your Vistabule. Check out some pictures HERE. It has zips to allow you to use both the doors and the rear hatch while the cover is still installed so you can access the trailer without unstrapping the cover while in storage. We can sell and ship you one for $495. Contact us at [email protected] and we’ll verify we have them in stock for you so you can come pick one up or we can get one on the way to your door.
The current bike rack can be retrofitted in a couple of different ways. We can remove the black box and install the bike rack for around $1000. You can also install the rack yourself; it is not difficult but is a bit fiddly. We use 1Up roof rack mount bike racks and some custom spacers to mount the racks to predrilled holes on the front of the trailer tongue. We can send you the spacer kit, hardware, instructions and 15 minutes of phone support for $100. This allows you to purchase the bike racks directly from 1Up and do the install yourself.
You can replace it yourself or we can do it for you. The fender, black welting, and hardware runs about $55, if you have 3M rock guard that adds $110 (this is performed by a 3rd party and may delay shipping). Installation here at the shop will add $130, or we can package and ship to you. Some 2025 shipping costs were $45 to Michigan, and $80 to Washington state.
The fender is most often held with 3 bolts; some older trailers used more. The good news is that you can easily see the locations of the bolts, but loosening the bolts on the back side must be done blind/by feel. Jacking up the trailer and removing the wheel will make the job significantly easier.
We’ve used 2 different fenders over the years and the easiest way to tell them apart is by measuring the length from one end over the top and down to the other edge. The length will be either 48 1/2″ or 50″.
Let us know which length fender you have, if you have the 3M rock guard and if you can come in and have us install it or provide us with a shipping address and we can send them out to you.
The top is replaceable, but the stove has been discontinued. Here is a metal version and here is an unbreakable version available on ETSY (we’ve installed this and it looks fantastic and feels VERY durable). Dometic calls the stove the D21 mode so you may also be able to find a replacement top on e-bay or FB marketplace.
We changed from adjustable 7″ drum brakes to 10″ self-adjusting at about trailer #890. If you eyeball or measure the diameter of the drum brake inside the wheel, you will be able to determine which version you have. There is no performance advantage to having the self-adjusting brakes, and adjustment is typically included during an axle service which is recommended to be performed each season.
We don’t offer the brake switch; theoretically we would need to swap only the brake mechanism and hubs which are close to $1600 for the pair and would likely require 4+ hours of labor. It would be more straight forward and perhaps cheaper to swap to the new axle which would run over $2500. Additionally, we changed from a 12″ to 13″ spare tire to clear the larger brake drum and also needed to change the frame to accommodate the larger diameter spare tire. You would also need a new spare, and it would no longer fit under the tongue of the trailer.
The Dexter axle is pretty standard in the trailer/RV industry, so it may be possible that other trailer or RV shops may offer this, but it would come with drawbacks.
The Vistabule comes pre-wired with a Zamp/GoPower-Solar on the Side Port wired directly to the battery bank. This is perfect for connecting a regulated (charge controller equipped) Zamp/GoPower-Solar on the Side Portable Solar Panel Kit. Because the Zamp/GoPower-Solar on the Side port is wired directly to the input side of the battery it needs to be fed with regulated power to avoid damage and to properly charge the battery. A Zamp/GoPower-Power on the Side panel has its own solar controller mounted to the panels so it can output the correct charging “recipe” to the battery. Typically, solar panels that connect directly to a solar generator are unregulated and the solar controller is built into the solar generator itself. Plugging this type of panel directly into the Zamp/GoPower port may cause damage to the electrical system and will not charge the battery properly. Having a solar controller wired between the panels and the battery is needed. The controller will also need to be set for the battery type/chemistry to properly charge the battery. https://gopowersolar.com/solar-on-the-side/
The Vistabunk complete set is $150 plus $42 for installation, if you aren’t local, you can install it yourself as well.
The kit includes mounting brackets, a sling, and two 56 15/16″ wooden closet rods. If you would like the kit shipped, we offer two versions: a complete kit with all parts, or a kit without the rods. Because the rods are long, they are difficult to package and can make shipping more expensive. If we ship only the sling and mounting brackets, you can buy two rods locally, cut them to length, and save $30 on the kit cost ($120 instead of $150), plus about $10–$30 in shipping.
We recommend the Victron Orion-Tr Smart 12/12 18amp DC-DC charger. It regulates the charging voltage/current properly for the trailer battery, prevents backflow between the trailer and vehicle, and is compatible with both smart alternators and lithium batteries. If your tow vehicle has a smart alternator, we strongly recommend using a properly configured DC-DC charger between the vehicle and the trailer battery. Smart alternators often reduce charging voltage while driving, which can make direct charging through the standard 7-pin connector unreliable, especially for lithium batteries.
For best performance, we also recommend using 10ga charging wire between the tow vehicle battery and 7-pin plug whenever possible. Because the run of wire is so long, charging performance will always be limited, in practice we’ve seen between 6-8 amps of charging power which is equivalent to 6%-8% of added charger per hour of driving.
We can install the DC/DC charger for you here in the shop for $480, or you can purchase the charger on your own and we can send you the instructions, wiring harness and provide 30min of phone support for $75.
This is a relatively common issue and typically happens when some water is left in the spray head and freezes which will expand and crack the spray head. THIS is the unit that we use from Menards, but you can find nearly the same thing at Home Depot, Lowes or your local hardware store which should attach in the exact same fashion.
There is a video in the link that shows installation of the WHOLE system but if you watch from the 1-minute mark to the 1:20 mark, it will show you how to replace just the spray head. You can unscrew the top of the sprayer from the base where the hose goes in, then pop off the C shaped clip and pull the hose out and bring it with you to the hardware store, and they’ll get you set up.
We have replacement parts for this. The aluminum sleeve may have come loose and slid inside the carbon-fiber outer pole. We can send you a single replacement section at no cost so you can rebuild the pole yourself. All sections are the same length except one end section. The carbon-fiber sections are either 14” or 16” long, not including the plastic end piece or aluminum sleeve. You can also remove and replace the internal shock cord yourself. Here is an REI video that shows how. Alternatively, we can send you a complete new pole with all sections and shock cord for about $50.
For some parts, yes. We have extra crank handles, and blue knobs for adjusting the ratchet function as well as the knob to release the steering/ratchet arm. We may have a few other parts like wheels that we’ve scavenged from used or broken jacks as well. The blue knobs run $15 each and we can send them out to you. Let us know if the knob you want is to adjust the ratchet motion on top of the wheel, adjust the ratchet motion on the ‘arm’ or to release the steering/ratchet arm. The US importer, ArkCorporationUS doesn’t stock the knobs but does have crank handles, wheels, ratchet handles and crank handles, if they have it go ahead and order from them.
The front window is laminated glass, similar to an automotive windshield. Small rock chips can usually be repaired by a local auto-glass shop. If the window is cracked or broken, it should be replaced. We can replace it at the Mothership for about $700. If you cannot bring the trailer to us, a local auto-glass shop can do the installation, and we can drop-ship the window to you. Drop-shipping costs include packaging/crating ($125), freight (about $400), the window ($389 plus tax), and a lift-gate truck fee ($110) if the delivery location does not have a dock door. You will also need a new gasket from us for $30, plus about $15 shipping and tax. The window ships flat in a crate on a pallet with a stated weight of 105 lbs.
Yes. The Vistabule awning is compatible with all Vistabule trailers and can be installed by anyone comfortable using a drill or screwdriver. We can install it here at the Mothership, or we can send the awning, rails, and instructions for home installation. Each kit includes two rails—one for each side—so you can choose which side to use at camp. You can also add a second awning for coverage on both sides. The awning and rail kit costs $495, a second awning costs $415, installation or shipping each run about $50.
Yes we can! We offer a couple of different inspection packages that will allow an expert set of eyes to look over your trailer.
Level 1 inspection – $99 ala carte
- Inspect door latches and quarter turns for smooth operation and check latch/plate clearance
- Check for door sag
- Inspect Fan Shroud – inspect caulk and shroud for cracks or evidence of leakage
- Inspect tongue jack – jockey wheel, locking mechanism, handle and ratchet hardware if equipped
- Tires – Check for uneven wear, check and adjust tire pressure
- Inspect top panel seams: below window, above window, hatch
- Inspect Awning rails for adhesion and screws.
- Inspect hatch hinge and hinge tape, verify end of tape extends into trim
- Bike rack/tongue box solidly secured
Level 2 inspection – $350 ala carte
all the above checks, plus
- inspect door gasket for suppleness, cuts/tears
- Inspect window gaskets – doors, porthole, front and hatch.
- Inspect interior for water damage: doors, front bent ply, stargazer window, cross beams, fan flange/ceiling, side walls, upper cabinets (Wolf leak)
- Check Porthole window clips and bendy light clips.
- Froli System securely attached
- Inspect edge seam and black vinyl trim
- Inspect hatch edge trim, pay particular attention at corners and skin overlap
- Inspect hatch gasket and caulk at gutter
- Inspect hatch bags, sliding galley doors and cooler slides
- Inspect inside of hatch and galley area for water damage
- Check 7 pin operation – check lights, charge line, DC/DC charger, brakes
- Inspect axle trailing arms for bending/damage, mounting hardware, brake wiring visually connected
- Safety package – check CO alarm, Propane alarm, smoke detector, fire extinguisher visual charge check
- Test interior lights, stargazer lights/outlet, porch lights, AC outlets, GFI, 12v outlets
- Test plumbing system for leaks – faucet, side sprayer, fresh and gray tanks. Sealing at galley wall.
- Test propane system – stove/furnace operational, sniffer for leaks
- Update Victron device firmware, verify settings correct for battery type. Test proper operation of Battery charger, battery monitor, solar controller, DC/DC charger
- Undercarriage/lift inspection – H20 tanks/plumbing, Furnace and A/C vents, battery bin, spare tire pressure, water proofing under trailer.
The VB electrical system is pretty simple… There are distinct AC and DC systems which do not intersect.
The only things that run on AC power are the air conditioner, the battery charger and any other devices you plug into the two AC outlets. There is no inverter, so to use any AC power you need to be plugged into shore power.
- The Air Conditioner is a relatively standard window unit that typically draws ~5–7 amps while running, and up to 10–12 amps briefly at startup (compressor kick-on).
- The battery charger will use up to 1.9amps during it’s bulk charging phase which lasts no longer than 7 hours if the battery is fully depleted.
The DC system is powered by the battery and runs all the 12v devices: the Dometic cooler/fridge, MaxxFan ventilation fan, and the lights. The system is protected by a main 25amp fuse as well as individual 10- or 5-amp fuses for each circuit. Typically, we see that people are easily able to run these items for a long weekend on a single Lithium battery charge. Charging the battery can be done with:
- AC powered battery charger – up to 15amps/hr
- the rooftop solar panels – 160watts – in Minnesota, 4.5–5.5 peak sun hours per day, 75–85% of theoretical = 62Ah × 0.8 ≈ 50Ah per day
- stand alone Zamp/GoPower Panels
- DC/DC charger while driving – 6-7amps/hr while driving
Rough estimates of DC power usage:
- Dometic CFX5 35 At 75°F ambient, set around 37–40°F: Compressor draw (when running):~4.5A
- Duty cycle at 75°F Typically 25–35%, Average hourly draw: 4.5A × 0.30 ≈ 1.35A average,Daily fridge consumption:1.35A × 24h ≈ 32Ah per day in moderate weather.
- MaxxFan Usage, Overnight Medium ≈ 1amp× 8h = 8Ah, Daytime Low ≈ 0.2–0.3A × 16h ≈ 4Ah, total per 24h: 8 + 4 = 12Ah
If you are plugged into shore power/solar generator the battery will always be charging, there isn’t an easy way to avoid this (other than unplugging the battery charger) so when running the Airconditioner from your generator the generator will also be charging the battery.
Power loads in the trailer
12V DC DEVICES (Battery Powered)
- Dometic CFX5 35 Running draw: ~4.5A Average at 75°F: 1.2–1.5A Daily use: ~30–35Ah
- MaxxFan Deluxe Speed/Amps Low 0.2–0.3A, Medium ~1A, High 2–3A
- LED Lighting – Cabin/galley/mood lights (each) ~0.1–0.4A
- Water Pump 4–7A while running, Only runs intermittently, Daily average typically <1Ah unless heavy use
- Propex Heatsource (Propane heat, but blower is electric) 1.5–2A while running, about 10 min/hour @30 dgrees
- 12V Socket / USB Outlets -Phone charging: 0.5–1A per device while charging
- Propane / CO detectors Always-On Background Loads, ~2–3Ah/day
120V AC DEVICES (Shore Power Only)
- Air Conditioner Running: 5–7A @120V, Startup surge: 10–12A, ~600–800 watts running, Cannot run on battery
- Victron Blue Smart IP65 Charger, Outputs 15A @ 12V (180W) ~1.8A @120V max
- Standard AC Outlets, whatever you plug in
Charging Sources
- 160W Rooftop Solar Panel – Peak output: 160W, Real world daily: 40–55Ah (sunny MN summer)
- Controlled by: Victron SmartSolar MPPT 75/15 Up to 15A charge current to battery
- Victron Orion-Tr Smart DC-DC Charger 6-8A typical while towing